The automated installer for FileUp version 5.4 and above can be run on Windows Server 2008 (x86 or x64) or Windows Server 2008 R2 without any special considerations. On a 64-bit OS, additional configuration steps are required for your application.
The installer for FileUp versions 5.1.1 through 5.3.3 can be run on Windows Server 2008 and 2008 R2 with some additional manual steps, depending on whether the installation is for ASP or ASP.NET and whether or not the samples are being installed.
Versions of FileUp prior to 5.1.1 do not support Windows Server 2008 and above
This article describes the steps needed to successfully run the installer for FileUp versions 5.1.1 through 5.3.3 on both Windows Server 2008 and Windows Server 2008 R2. |
Again, the installer for FileUp version 5.4 and above should work fine on Windows Server 2008 (x86 or x64) or Windows Server 2008 R2.
Note: These instructions are for installing FileUp versions 5.1.1 through 5.3.3 on Windows Server 2008 and Windows Server 2008 R2 (32 or 64 bit).
Installing without the samples
- Right click the installer and select Run as Administrator.
- Under Setup Type, select Custom.
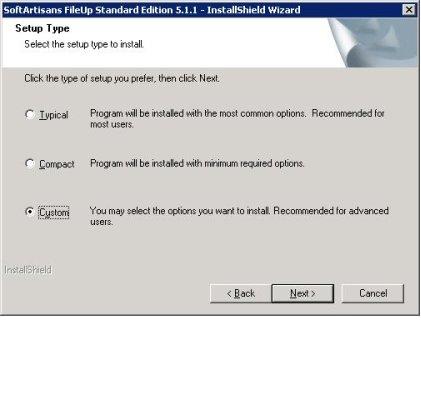
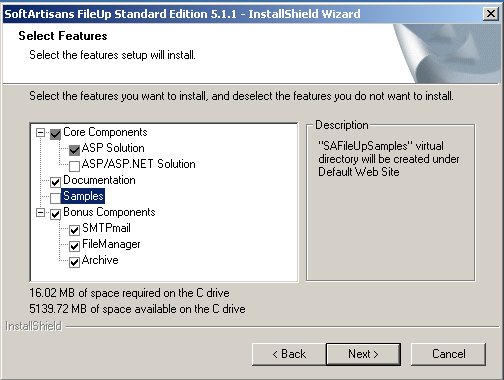
- Uncheck ASP/ASP.NET Solution and Samples
The FileUp dlls for both ASP and ASP.NET will be unpacked, even with this option unchecked.
- Follow the prompts until the completion.
FileUp is now installed, but additional configuration may be required before using FileUp in any applications. See Next Steps.
Installing with the samples
When installing the samples there is one main consideration: the current version of the FileUp installer cannot install the samples on Windows Server 2008 unless IIS is set to be IIS6 Compatible. After the installation IIS can be set back to native IIS7 mode (IIS7.5 for Windows 2008 R2).
In order to install FileUp along with the samples on Windows 2008 or Windows 2008 R2, follow these steps:
Step 1: Set IIS7.x to be IIS6 compatible
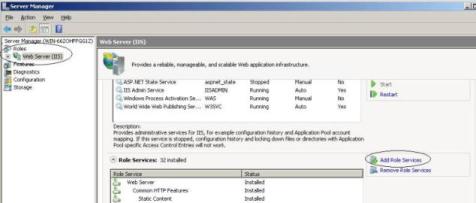
- Go to Start > Server Manager
- Under Role Summary select IIS
- Click Add Role Service
- Check IIS Management Compatibility
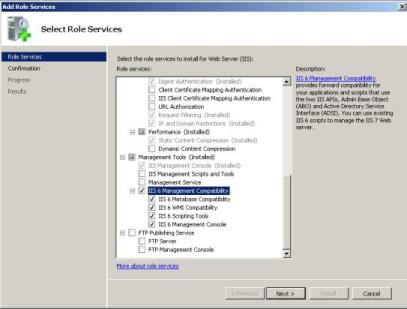
- Click Install
Step 2: Run the FileUp Installer
- Right click the installer and select Run as Administrator
- Continue through the entire installation.
FileUp is now installed on your machine, but futher configuration is required to run the samples.
Step 3: Set the Samples Application Pool in IIS
32-bit OS
Change SAFileUpSamples virtual directory to work in a Classic .NET pipeline mode (Note: even if you are not using the .NET samples, this change is required because the samples application includes both classic ASP and ASP.NET samples):
- Go to Start > Control Panel > Administrative tools > Internet Information Services (IIS)
- Go to Administrator > Sites > Default Web Site and right click SAFileUpSamples
- Go to Manage Application > Advanced Settings.
- In Advanced Settings, under General select Application Pool and clcik the button that appears when selected. This will opent he Select Application Pool window.
- Change the Application Pool setting from DefaultAppPool to Classic .NET AppPool from the drop-down.
If you do not have a Classic .NET AppPool, see how to create one.
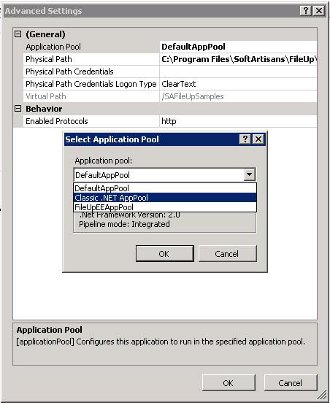
- Click OK.
64-bit OS
Create a new application pool in IIS that is set to use the Classic .NET pipeline mode and turn on the Enable 32-bit Applications swtich for that application pool:
- Go to Start > Control Panel > Administrative tools > Internet Information Services (IIS)
- Right click Application Pools from the left pane and select Add Application Pool
- In the Add Application Pool window, enter a name for the application pool, for example "FileUp Classic .NET AppPool 32-bit", and set the managed pipeline mode to Classic
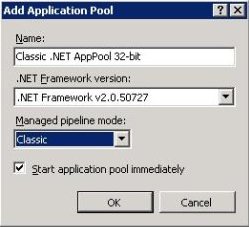
- Click OK.
- Go back to the Application Pools on the left pane in IIS.
- Select and right-click the newly created application pool from the middle pane and go to Advanced Settings.
- In the Advanced Settings window set the Enable 32-bit Applications switch to True.
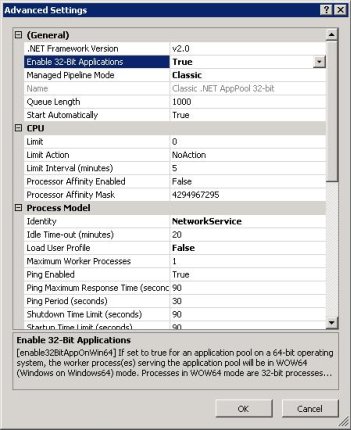
- Click OK.
- Go to Administrator > Sites > Default Web Site and right click SAFileUpSamples
- Go to Manage Application > Advanced Settings.
- In Advanced Settings, under General select Application Pool and clcik the button that appears when selected. This will opent he Select Application Pool window.
- Change the Application Pool setting from DefaultAppPool to the newly created application pool from the drop-down.
- Click OK.
The following step (4) is for configuring the ASP.NET samples. If only the classic ASP samples are needed, skip to step (5).
Step 4: Add the UPLX extension
These instructions are for the .NET samples ONLY.
- Go to the SAFileUpSamples virtual directory in Feature View
-
- Under the IIS section double-click Handler Mappings
<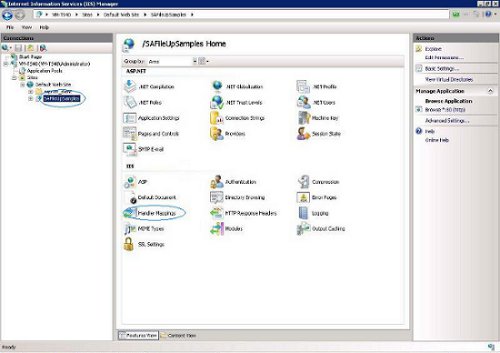
- From the menu on the right, choose Add Script Map
- On the first text box enter: *.uplx
- Click the browse button.
- Go to C:\Windows\Microsoft.NET\Framework\v2.0.50727 and choose aspnet_isapi.dll
On 64-bit systems, make sure that you are choosing the 32-bit version on the ASP.NET dll
- In the third text box enter a name (anything you like)
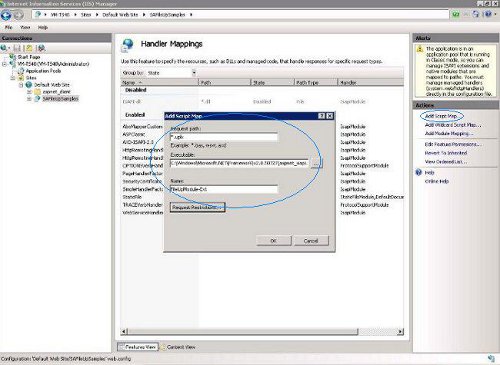
- Click OK.
- For earlier than 5.3.0: Uncomment the section of the samples web.config
- Make sure there is a section for the new .uplx extension in web.config and that it points to .NET v2. It should have been added by IIS. If it wasn't automatically added, you would receive this error at runtime: "The requested content appears to be script and will not be served by the static file handler”.
The following section should be placed before the </configuration> tag but after the closing of </system.web> tag:
<system.webServer>
     <handlers>
         <add name="Enter the Extension name from step 4.g" path="*.uplx"
verb="*" modules="IsapiModule"
scriptProcessor=
 "C:\Windows\Microsoft.NET\Framework\v2.0.50727\aspnet_isapi.dll"
 resourceType="Unspecified"
preCondition="classicMode,runtimeVersionv2.0,bitness32" />
     </handlers>
</system.webServer>
Step 5: Restart IIS
This can be done at the command line by typing iisreset at the command prompt.
Step 6: Return to native IIS 7.x mode
- Go to Start > Server Manager
- Under Role Summary select IIS
- Click Remove Role Service
- Uncheck IIS Management Compatibility
- Click Install
FileUp is now installed, but additional configuration may be required before using FileUp in any applications. See Next Steps.
Next Steps
64-bit OS:
If FileUp is installed on a 64-bit machine, additional configuration is required before using FileUp in your own applications: How to run FileUp on a 64-bit Windows Operating System.
32-bit OS:
- ASP.NET: If your FileUp is an ASP.NET application, additional configuration is required before using FileUp in your own applications: HOW-TO: Add FileUp to an ASP.NET application
- Classic ASP: If your FileUp application is for classic ASP, no additional configuration is required.
|

