Requirements
- FileUp is installed on Windows 2003, Windows Vista/7, or Windows 2008 (R2)
- If on a 64-bit machine, IIS has a 32-bit enabled app pool (IIS 7.x), or it has been configured to run in 32-bit mode (IIS 6): How to run FileUp on a 64-bit machine
- If performing uploads in IIS 7.x: IIS must have an application pool that is set to run Classic pipeline mode.
Add the appropriate FileUp dlls to the bin directory of the application
During the installation process, the following dlls are unpacked to the SoftArtisans\FileUp{SE|PE}\dotnet directory in Program Files (or Program Files (x86) on 64-bit machines). These dlls are required for using FileUp in ASP.NET and need to be added to the bin directory of your .NET application:
| Assembly | Description |
| safileup.dll | FileUp's main .NET dll which includes interop support for FileUp's COM objects |
| FileUpModule.dll | (Recommended) FileUp's HTTPModule. It is recommended that your .NET FileUp application uses the HTTPModule to overcome .NET performance limitations when performing uploads. For applications performing uploads only. |
| SAPrgres.dll | (Optional). FileUp's server-side progress indication. The COM version of this dll will have been registered during installation, but this dll must be made available for .NET |
The dlls can be added to the bin directory manually by copying the dlls to the bin folder. If you are using Visual Studio to develop your application, you should add the dlls as a reference to your project. This will automatically copy them to the bin directory of your application.
If your application is for downloads only, you do not need to complete the rest of the steps listed in this article. If your application will perform uploads, continue reading for how to configure and add FileUp's HTTP Module to your application.
Add UPLX to Handler Mappings
NOTE: These instructions are for applications that are performing uploads. If your application performs downloads only you do not need to follow these steps.
When using FileUp to perform uploads in ASP.NET, it is recommended that you use FileUp's HTTP Module, which processes incoming upload requests. To ensure that the HTTP Module only processes requests from a FileUp application, you should use the custom extension *.uplx and configure the HTTP module to ignore requests from all other page extensions.
To use the *.uplx extension you need to add *.uplx to the handler mappings for your site.
- Go to the Feature View in the virtual directory of your application
- Under IIS section double-click Handler Mappings

- From the menu on the right choose Add Script Map
- On the first text box enter: *.uplx
- Click the browse button
- ASP.NET 2.0: Go to C:\Windows\Microsoft.NET\Framework\v2.0.50727
ASP.NET 4.0: Go to C:\Windows\Microsoft.NET\Framework\v4.0.30319
- Select aspnet_isapi.dll
On 64-bit systems make sure you are choosing the 32-bit version of the ASP.NET dll
- In the third text box enter a name (You can call it anything you like)
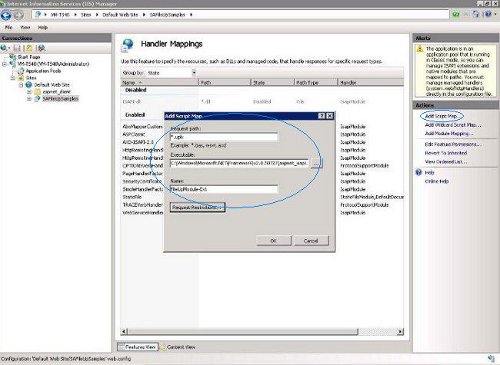
- Click OK
Update the web.config file for the application
NOTE: These instructions are for making FileUp's HTTP Module available to your application. The HTTP Module handles upload requests, so if you are using FileUp for downloads only, you do not need to follow these steps.
Step 1
Under <system.web> in your application's web.config file, add an <httpModules> section, which will load the FileUp HTTPModule for the application. Note: The version number must match the FileUpModule.dll in the bin directory exactly.
<httpModules>
      <add name="FileUpModule" type="SoftArtisans.Net.FileUpModule,
 FileUpModule, Version=5.3.2.77,
 Culture=neutral, PublicKeyToken=f593502af6ee46ae" />
    </httpModules>
Step 2
In the same <system.web> section, add an <httpHandlers> section, which will allow pages with the *.uplx file extension to be processed by ASP.NET.
  <httpHandlers>
      <add verb="*" path="*.uplx" type="System.Web.UI.PageHandlerFactory" />
    </httpHandlers>
Step 3
Under <compilation in the <buildProviders>, add a section for the *.uplx extension.
<system.web>

 <compilation>
           <buildProviders>
             <add extension=".uplx"
 type="System.Web.Compilation.PageBuildProvider"/>
           </buildProviders>
 </compilation>

</system.web>
Step 4
Make sure there is a <handlers> section for the new .uplx extension in web.config and that it points to the version of .NET that you are using. It should have been added by IIS. If it wasn't automatically added, you would receive this error at runtime: "The requested content appears to be script and will not be served by the static file handler”.
The following section should be placed before the </configuration> tag, but after the closing of the </system.web> tag:
ASP.NET 2.0
<system.webServer>
     <handlers>
         <add name="Enter the Extension name from step 4.g" path="*.uplx"
verb="*" modules="IsapiModule"
scriptProcessor="C:\Windows\Microsoft.NET\Framework\v2.0.50727\aspnet_isapi.dll"
 resourceType="Unspecified"
preCondition="classicMode,runtimeVersionv2.0,bitness32" />
     </handlers>
</system.webServer>
ASP.NET 4.0
    <system.webServer>
            <directoryBrowse enabled="true" />
            <handlers>
                <add name=".uplx .NET 4.0" path="*.uplx"
verb="*" modules="IsapiModule"
 scriptProcessor="C:\Windows\Microsoft.NET\Framework\v4.0.30319\aspnet_isapi.dll"
 resourceType="Unspecified"
preCondition="classicMode,runtimeVersionv4.0,bitness32" />
            </handlers>
        </system.webServer>
|

