|
| Product |
| ExcelWriter |
| Version |
| 3.8.1 and later |
| Title |
| How to import data into areas with merged cells |
| Problem |
| Your solution requires that you import data into an area that contains merged cells, but when you call ImportData ExcelWriter throws an exception saying: "Error importing data; Number of available cells to import exceeds the number of cells available, and DataImportProperties.Truncate is not true. This is most likely due to merge cells contained in the region you are importing to." |
| Solution |
Understanding Merged Cells
When you create an area of merged cells, either with Excel or ExcelWriter, all the cells in the merged area except for the top left one become masked. Only the data in the top left cell is preserved in the merge, and getting or setting the Value property of any of the masked cells will actually affect the Value of the top left cell. While it may seem that the masked cells have disappeared, they are in fact still there, just disguised.
In most cases, we can ignore the fact that a cell is part of a merge, and changing its properties will do the right thing. In addition to Value property of any cell affecting the top left one, changing the style of any cell in a merge will appear to change the style of the entire merge for example.
The ImportData function is not as flexible though. Using either Area.ImportData or Worksheet.ImportData on an area with merged cells can throw an error similar to the one above. In this article I'll talk about the source of these errors and show how to avoid them while importing data into merged cells.
Horizontal Merges
The easiest sort of merged cells to deal with are ones merged horizontally. That is, each merged cell may spread across multiple columns but only one row.
When importing data into horizontally merged cells, there are two rules to keep in mind:
- The data must be rectangular. Every row must have the same number of elements.
- The shape of the data must match the apparent shape of the destination area. When using Area.ImportData, there can be no more rows in the data than there are in the area, and at least as many unmasked cells in each row of the area as there are columns in the data. When using Worksheet.ImportData, you don't specify the full extent of the area to import into, only the top left cell, so the data can be any size.
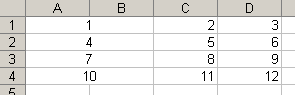
An example will make this clearer. Let's say you have some data with three columns and four rows. The simplest thing to do would be to import it into an area with no merged cells, say A1:C4. But if the cells in column A have been merged with the cells in column B then that area would only have an apparent width of 2 columns, too small to accomodate your data. Instead, import it into A1:D4. The first element in each row will be in the A/B merged cell, the second in column C, and the third in D. With some simple data, this would look like:
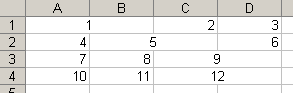
 The merged cells don't have to be in the same columns. To continue the example above: the first row in the destination area could have A1:B1 merged, the second could have B2:C2 merged and the third and fourth could have C merged with D. As long as each row has the same number of unmasked cells it doesn't matter which cells in the row are merged. With the same data as before, now the spreadsheet looks like this:
Vertical Merges
ImportData adds data to the workbook moving from the left to the right and the top to the bottom. In the course of this transversal, if it encounters the top left cell in a merged cell it puts the next piece of data into the merged cell, then skips right past the merged cell and continues. If it encounters a cell on the left side a merge that isn't the top, ImportData simply skips past the cell entirely and continues importing.
In the last section, this was exactly the behavior we wanted; each piece of data ended up in the correct cell. But when you add vertically merged cells – cells that can extend not only across multiple columns, but also multiples rows – into the mix, things get more complicated. In order to deal with vertical merges, there are a few more rules to follow:
- Don't stagger the vertical merges. Adjacent vertical merges should begin and end on the same row.
- Always use Worksheet.ImportData instead of Area.ImportData. When ImportData skips vertically merged cells it will try to put data outside the destination area, causing Area.ImportData to throw an error. Because Worksheet.ImportData doesn't have any bounds on the destination area, it won't crash when this happens.
- Insert blank rows into the data. For each row in the destination area that isn't the top of a vertical merge, add a blank row at the same position in your data that consists entirely of null values.
- Always use a DataImportProperties object with its IgnoreNulls property set to true. The effect of these rules is to have ImportData push only the blank rows past the edge of the destination area, and then ignore the data in them.
Let us revisit the example from earlier. Again, we have three columns and four rows of data, but this time we want each cell we import into to be two cells tall. This means the destination area is A1:C8 instead of A1:D4. The first step is to add blank rows to the data. In this example I'll use a DataTable, but the same effect could be achieved with an array, or by converting another ADO.NET data object to a DataTable. The next step is to create a DataImportProperties object, then pass it to Worksheet.ImportData.
|
[C#]
|
[VB.NET]
|
|
// Create a DataTable and make every other row in it blank
// By default, a row created with DataTable.NewRow() contains only null data.
DataTable dt = GetSomeData();
int numRows = dt.Rows.Count;
for(int i = 0; i < numRows; i++)
    dt.Rows.InsertAt(dt.NewRow(), i * 2 + 1);

// Create a DataImportProperties object and set it to ignore nulls.
// This way we make sure that no data outside the destination area
// gets overwritten with null values.
DataImportProperties props = wb.CreateDataImportProperties();
props.IgnoreNulls = true;
ws.ImportData(dt, ws["A1"], props);
' Create a DataTable and make every other row in it blank
' By default, a row created with DataTable.NewRow() contains only null data.
Dim dt As DataTable = GetSomeData()
Dim numRows As Integer = dt.Rows.Count
For i = 0 to (numRows - 1)
    dt.Rows.InsertAt(dt.NewRow(), i * 2 + 1)
Next

' Create a DataImportProperties object and set it to ignore nulls.
' This way we make sure that no data outside the destination area
' gets overwritten with null values.
Dim props As DataImportProperties = wb.CreateDataImportProperties()
props.IgnoreNulls = true
ws.ImportData(dt, ws("A1"), props)
|
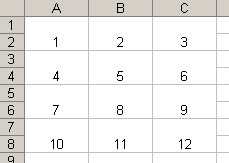
This will produce the result seen below. Be aware, though, that the call to ImportData we made looks at cells outside the pictured area. Specifically, it looks at the three cells to the right of the merged cells on odd-numbered rows. This is because on odd-numbered rows ImportData skips past the merges and continues importing. Because the odd-numbered rows in our data contain only null values and the DataImportProperties object we used had IgnoreNulls set to true, any data in those cells was preserved. Because of this, always know which rows in your data are going to be pushed past the edge of the destination area, and fill those rows with null values, then set IgnoreNulls to true.
Appendix: Converting DataReaders and DataViews to DataTables
As explained in the last section, properly importing data into vertically merged cells requires inserting blank rows into the data before calling ImportData. Some of the ADO.NET objects that ImportData accepts, DataReaders and DataViews, do not allow you to insert rows into them. If you code currently uses one of these objects, you'll have to convert it to an object that does allow row insertion before you can import into vertically merged cells.
The best way to create a DataTable from a DataReader is to use DataTable.Load, a function that takes an IDataReader object and fills a DataTable with the rows from it. More information about using the Load method can be found on its MSDN page.
The best way to create a DataTable from a DataView is to call the DataView.ToTable method. This returns a DataTable that contains only the rows in the DataView. You can then add blank rows to this DataTable and pass it to ImportData. |
| Created : 11/24/2008 10:14:05 AM (last modified : 1/5/2009 3:02:12 PM) |
|

